Introduction to Amazon Elastic Cloud Compute (EC2)
So what is EC2?
Amazon Elastic Compute (EC2) is a web service that provides reliable computer capacity in the cloud. EC2 reduces the time required to obtain and boot new server instances to minutes, allowing you to quickly scale capacity, both up and down as your computing requirements change. Moreover, EC2 allowing you to pay only for capacity that you actually use this is a big benefit for the economic side for any company
EC2 Options
OnDemand - Allow you to pay a fixed rate by the hour (or by the second) with no commitment.
Users that want low cost and flexibility
No Up any upfront payments or long term commitment
Reserved - Provide you with a capacity reservation and offer a significant discount on the hourly charge for an instance. 1 Year or 3 Year terms.
Application with steady-state
Application that requires a reserved capacity
Spot - Enable you to bid whatever price you want for instance capacity, providing for even greater savings if your application has flexible start and end times.
Application that has a flexible start and end time.
Application that are only feasible at vet low Compute prices
Dedicated Hosts - Physical EC2 server dedicated to your use Dedicated host can help you reduce costs by allowing you to use your existing sever-bound software licenses.
Can be purchased OnDemand (hourly)
EC2 Instance Types

Image source
Scenario -:Build your EC2 and Test it
To do this you have to log in to your Amazone account
Launch EC2 Instance
Go to the services and under Computers select EC2 or use the search bar and type EC2
In New EC2 Experienc Select Instances and Select Launch Instances
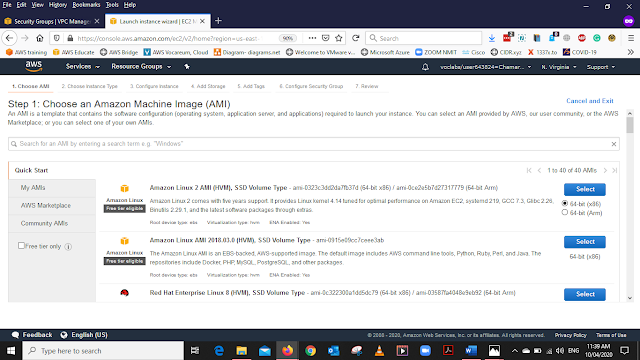
In Amazone Machine Image(AMI) Select the Amazone Linux 2 AMI 64 BIT
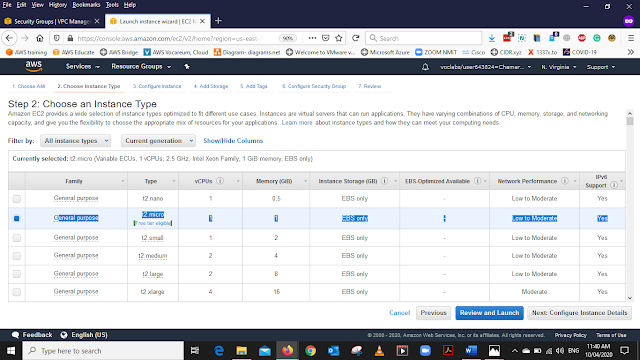
Chose the Instance Type as General Purpose as it in the above image. Then Click Configure Instance Details
In the Configure Instance, Details Add the below details
Network - LAB VPC
Enable termination protection -Protect against Accidental termination (Put the Tick)
Enable termination protection -Protect against Accidental termination (Put the Tick)
Move to the Advance details Tab and Copy and Paste the below code to User Databox and select Review and Lunch the Instance
#!/bin/bash
yum -y install httpd
systemctl enable httpd
systemctl start httpd
echo '<html><h1>Hello From Your Web Server!</h1></html>' > /var/www/html/index.html
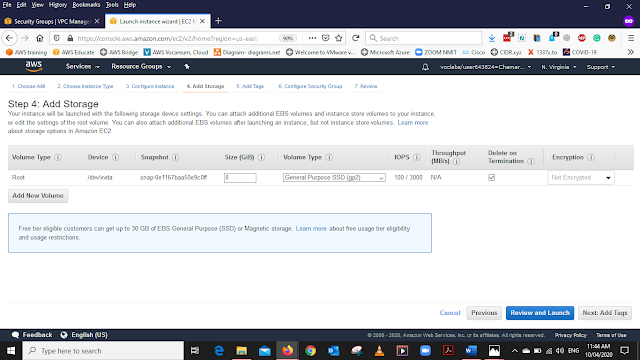
In the Add Storage Tab keep the default settings
In the Add tags Tab Select Add Tag as below
Key - Name
Value - Web Server
In the Configure Security Group, Select Create a new Security Group and the detail below, then select Review and Lunch
Security group name: Web Server security group
Description: Security group for my webserver
The last Tab will be Review Instance Launch Select Launch
You will Ask to select the KEY PAIR, select the Proceed without a key pair, and put the tick in I acknowledge that I have access to the .....
Select Lunch Instance
After launching the instance we will get the Launch status in that click View Instance
The instance is still Pending
The instance is Up and Running But still, we have to wait until Status Check is Completes
Status Check is Completed 2/2
Monitor The Instance
from the bottom, menu list select Status Checks and Check the System Status Checks and Instance Status Checks has PASSED
Check the Monitoring tab
Now We are going to enable the System log Go to the Action Menu Select Instance settings and in that menu select Get System Log
We can identify that HTTP has been install and this was installed using the script that we add for the User data when we creating an Instance
Now we are going to get a Screenshot of the instance Go to the Action Menu Select Instance settings and in that menu select Get Instance Screenshot
This will be the Screenshot
Note-: This will help to
Update Security Group and Access the Web Server
Now will try to log in to the Web server from Description Tab Copy the IPv4 Public IP Try to login to the Web using that IP Use the web browser to login
This should be the result cause we want be able to Reach the Web we haven't enable Security option for HTTP
In the New EC2 Experience, from the left side menu Security Groups
Select the Web Server Security (The Security group we created earlier ) from the bottom menu select "INBOUND RULES " Edit Inbound Rules
Select Add Inbound Rule and add the details as below and Save Rule
Type- HTTP
Source- Anywhere
Inbound Rule has created Successfully
Try to login to the Web using that IP Use the web browser to login, We should be able to view this page.
Resize Your Instance
Now we are going to Resize the Instance and to do that we have to stop the instance state
Go to the Action Menu Select Instance State and in that menu select Stop
Resize Your Instance


No comments:
Post a Comment